In this application we are going to create slider by using view based application.


I'd love to hear your thoughts!!
Getting Started
Open up Xcode and create a new project with the iOS\Application\Single
View Application template.
For the Product Name enter "Slider", for
the Device Family choose iPhone and go next..

open header file "SliderViewController.h" and modify it like this..

now come to implementation file, open "SliderViewController.m" add changeSlider method's body at the end of file (remember we have already declared this method in header (.h) file)


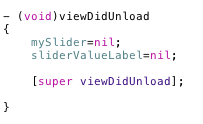
now modify "viewDidUnload" method in same file and release the ui controls
finally your "TextFieldViewController.m" file will look like this..

okay!! enough code now lets play with UI so just open "SliderViewController.xib" file
now drag Slider and Label on View and stretch this way..
our Slider should have min-max range (0 to 100) and default value (mine is 20) so change like this

we are almost done! we have written code and drawn UI controls on view.. now we need to connect these so do this
1.connect Slider through File owner

Label for showing result on it, through File owner

2.connect "changeSlider" method through file owner

select "Value Changed" event
That's it!! now save and go for build and Run the project output will be like this..

cheers!!
No comments:
Post a Comment