What's up 01000101 developers!!
Sitting on Rolling-Chair, Looking for good resources "How to use BarCode scanner in iPhone
".. on IT's Lord Google and digging on StackOverFlow.. but still not sure How to implement Bar Code Scanner.
Okay just chill you are landed up here and I bet, after 20 minutes you will have your own application for Scanning bar codes :)


So stay with me, and do it step by step by .. don't forget to drop me a message or comment.
At the end of this Tutorial you can find Complete Source code zip file.
What is BarCode?
There are two types of code scanner
1. BR Code (Bar Code / 1D)
Google says "A machine-readable code in the form of numbers and a pattern of parallel lines of varying widths, printed on and identifying a product."

2. QR Code (Quick Response Code / 2D)
A QR Code is a matrix barcode (or two-dimensional code), readable by QR scanners, mobile phones with a camera, and smartphones.

So we are going to use ZBar SDK for BR and QR code scanning in our iPhone application.
Note : This Application Developed Using : iOS 6 , Xcode 4.6, and MAC OS X Lion 10.8.1
PHASE - I (Create New Project)
So, Let's Fire Xcode!!
Go to File --> New --> Project
Now we can see a Pop up Window for selecting our application templet
So make sure you Single View Application templet as shown in below picture and Go for Next..

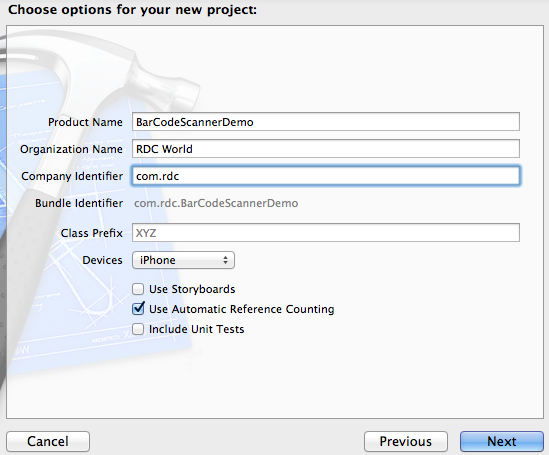
In the Next Window we need to put Our Project Details this way
-----------------------------------------------------------------
| Product Name : BarCodeScannerDemo |
| Organization Name :RDCWorld |
| Company Identifier : com.rdcworld |
| |
| Class Prefix : (leave it blank for now) |
| |
| Devices : iPhone |
----------------------------------------------------------------
Note : Don't forget to Make Tick mark on "Use Automatic Reference Counting" option.
Go to Next --> Create.
Now you can see Xcode default dashboard with our newly created project .
PHASE - II (Add Extra Frameworks/ Lib )
to use the ZBar Scanner we need to add ZBar SDK to our Project.
1. Download ZBar SDK I have uploaded zip file here also you can find latest SDK dmg file from official website here.
Click the + and add each of these seven frameworks.
- AVFoundation.framework
- CoreGraphics.framework
- CoreMedia.framework
- CoreAudio.framework
- CoreVideo.framework
- QuartzCore.framework
- libiconv.dylib


2. add one UILabel just below to ImageView and double click on it and put "Scan Result is :"
3. now drag UITextView and resize it like ImageView, double click and write "No bar code scanned.."
4. finally add one UIButton view and give it name as "Scan"

So just open ViewController.xib


@property (weak, nonatomic) IBOutlet UIImageView *resultImageView;
do the same for UITextView and give name as "resultTextView"
below line will added in header file
@property (weak, nonatomic) IBOutlet UITextView *resultTextView;

- (IBAction)startScanning:(id)sender;

#import "ZBarSDK.h"
@interface ViewController : UIViewController <ZBarReaderDelegate>
-----------------------------------------------------------------------------------------------------------------------------------------
//
// ViewController.h
// BarCodeScannerDemo
//
// Created by RDC on 3/11/13.
// Copyright (c) 2013 RDC World. All rights reserved.
//
#import <UIKit/UIKit.h>
#import "ZBarSDK.h"
@interface ViewController : UIViewController<ZBarReaderDelegate>
@property (weak, nonatomic) IBOutlet UIImageView *resultImageView;
@property (weak, nonatomic) IBOutlet UITextView *resultTextView;
- (IBAction)startScanning:(id)sender;
@end
-----------------------------------------------------------------------------------------------------------------------------------------
@synthesize resultImageView;
@synthesize resultTextView;
2. Now Here is application's Heart, update startScanning method body this way
- (IBAction)startScanning:(id)sender {
NSLog(@"Scanning..");
resultTextView.text = @"Scanning..";
ZBarReaderViewController *codeReader = [ZBarReaderViewController new];
codeReader.readerDelegate=self;
codeReader.supportedOrientationsMask = ZBarOrientationMaskAll;
ZBarImageScanner *scanner = codeReader.scanner;
[scanner setSymbology: ZBAR_I25 config: ZBAR_CFG_ENABLE to: 0];
[self presentViewController:codeReader animated:YES completion:nil];
}
3. Implement ZBar's Delegate method
- (void) imagePickerController: (UIImagePickerController*) reader didFinishPickingMediaWithInfo: (NSDictionary*) info
{
// get the decode results
id<NSFastEnumeration> results = [info objectForKey: ZBarReaderControllerResults];
ZBarSymbol *symbol = nil;
for(symbol in results)
// just grab the first barcode
break;
// showing the result on textview
resultTextView.text = symbol.data;
resultImageView.image = [info objectForKey: UIImagePickerControllerOriginalImage];
// dismiss the controller
[reader dismissViewControllerAnimated:YES completion:nil];
}
-----------------------------------------------------------------------------------------------------------------------------------------
//
// ViewController.m
// BarCodeScannerDemo
//
// Created by RDC on 3/11/13.
// Copyright (c) 2013 RDC World. All rights reserved.
//
#import "ViewController.h"
@interface ViewController ()
@end
@implementation ViewController
@synthesize resultImageView;
@synthesize resultTextView;
#pragma mark - ViewController's LifeCycle methods
- (void)viewDidLoad
{
[super viewDidLoad];
}
- (void)didReceiveMemoryWarning
{
[super didReceiveMemoryWarning];
}
#pragma mark - Button click method
- (IBAction)startScanning:(id)sender {
NSLog(@"Scanning..");
resultTextView.text = @"Scanning..";
ZBarReaderViewController *codeReader = [ZBarReaderViewController new];
codeReader.readerDelegate=self;
codeReader.supportedOrientationsMask = ZBarOrientationMaskAll;
ZBarImageScanner *scanner = codeReader.scanner;
[scanner setSymbology: ZBAR_I25 config: ZBAR_CFG_ENABLE to: 0];
[self presentViewController:codeReader animated:YES completion:nil];
}
#pragma mark - ZBar's Delegate method
- (void) imagePickerController: (UIImagePickerController*) reader didFinishPickingMediaWithInfo: (NSDictionary*) info
{
// get the decode results
id<NSFastEnumeration> results = [info objectForKey: ZBarReaderControllerResults];
ZBarSymbol *symbol = nil;
for(symbol in results)
// just grab the first barcode
break;
// showing the result on textview
resultTextView.text = symbol.data;
resultImageView.image = [info objectForKey: UIImagePickerControllerOriginalImage];
// dismiss the controller
[reader dismissViewControllerAnimated:YES completion:nil];
}
@end
-----------------------------------------------------------------------------------------------------------------------------------------
-----------------------------------------------------------------------------------------------------------------------------------------
//
// AppDelegate.h
// BarCodeScannerDemo
//
// Created by RDC on 3/11/13.
// Copyright (c) 2013 RDC World. All rights reserved.
//
#import <UIKit/UIKit.h>
@class ViewController;
@interface AppDelegate : UIResponder <UIApplicationDelegate>
@property (strong, nonatomic) UIWindow *window;
@property (strong, nonatomic) ViewController *viewController;
@end
-----------------------------------------------------------------------------------------------------------------------------------------
-----------------------------------------------------------------------------------------------------------------------------------------
//
// AppDelegate.m
// BarCodeScannerDemo
//
// Created by RDC on 3/11/13.
// Copyright (c) 2013 RDC World. All rights reserved.
//
#import "AppDelegate.h"
#import "ViewController.h"
@implementation AppDelegate
- (BOOL)application:(UIApplication *)application didFinishLaunchingWithOptions:(NSDictionary *)launchOptions
{
self.window = [[UIWindow alloc] initWithFrame:[[UIScreen mainScreen] bounds]];
self.viewController = [[ViewController alloc] initWithNibName:@"ViewController" bundle:nil];
self.window.rootViewController = self.viewController;
[self.window makeKeyAndVisible];
return YES;
}
//for now leave rest all empty methods..
@end
-----------------------------------------------------------------------------------------------------------------------------------------

Note : when it successfully read the code you can see Green Frame.

Hi RDC,
ReplyDeleteyou have explained the example step by step..its really gr8:)..
I have one issue.I have implemented all the steps,and trying out with the simulator .
I did the following steps:
1.clicked scan button,the image selection screen appears saying "camera simulation tap and hold with two fingers to select the image"
2.did the alt+left click [in simulator] to launch the photos app.
3.selected the QR IMAGE which is previously saved
The issue is the app is in the same screen showing the selected QR image and scan is not happening.
I guess the delegate method "imagePickerController:(UIImagePickerController *)reader didFinishPickingMediaWithInfo:(NSDictionary *)info" is not called.
Please guide as what should be done.
Hi,
ReplyDeleteThis is a handy tutorial. Thank you for offering a demo as well. Just one quick question. How to perform the result directly to the website instead of just show the url on the screen?
Hello,
ReplyDeleteThis is an excellent tutorial. Got things working while waiting for car repair.
One thing to add: A program probably wants to do something with the result besides showing the picture and the text. Closing the screen was not obvious.
One thing to change: I would think that the delegate method would be called in all cases (i.e. including Cancel). Since a dictionary is being passed, it would be easy to include a Cancel option. Just a thought.
Again, thanks. Great job.
Hi,
ReplyDeleteThis tutorial is great and very helpful,
but i would like to ask if possible to remove the toolbar?
please help me this.
thanks in advanced.
-Mark;
Extremely helpful, thanks! It's always nice to read a tutorial complete with pictures, they work so much better for me. It looks like smartphone scanning is part of the future, so I need to keep up on how to do it.
ReplyDeleteJenn | http://www.manateeworks.com